Author: Nayan Jha

  • Quantum Computing

    Quantum Computing – Easy Explanation

    Quantum computing is a new type of computing that uses the principles of quantum mechanics to solve certain problems in ways that can be very different from ordinary computers.

    Hello everyone, I am Nayan Jha, a Physics teacher from South Delhi. Today, I am going to explain one of the most fascinating developments in modern science — Quantum Computing.

    In this discussion, we will explore how quantum computers work, what makes them different from classical computers, and how concepts such as superposition, entanglement, and quantum interference are transforming our understanding of computation.

    So, let us begin this exciting journey into the world of quantum physics and discover the technology that may shape our future.

    To read /download the complete topic click here-

    Introduction

    We live in an age where computers have become an essential part of our daily lives. From smartphones and laptops to artificial intelligence and space exploration, classical computers have transformed the modern world. However, as scientific problems become more complex, researchers are exploring a new form of computation based on the fundamental laws of nature: quantum computing.

    Quantum computing is a revolutionary field of technology that combines computer science with quantum mechanics. Unlike conventional computers, which process information using classical bits, quantum computers use quantum bits, or qubits. These qubits can exhibit fascinating physical phenomena such as superposition, entanglement, and quantum interference.

    To understand how quantum computing works, we must first understand the basic principles of quantum physics.

    1. What is quantum computing?

    Quantum computing is a method of processing information using the principles of quantum mechanics, the branch of physics that describes the behavior of matter and energy at atomic and subatomic scales.

    A classical computer represents information using bits. Each bit can have one of two values: 0 or 1. These bits are processed using electronic circuits and logic gates to perform calculations.

    A quantum computer, on the other hand, uses qubits. A qubit can exist in a quantum superposition of the states 0 and 1. By carefully controlling these quantum states, a quantum computer can perform certain types of calculations in ways that are fundamentally different from classical computation.

    It is important to understand that quantum computers are not simply faster versions of ordinary computers. Their advantage lies in their ability to exploit quantum phenomena to solve particular classes of problems more efficiently.

    2. Difference between a classical computer and a quantum computer

    Classical computer

    • Uses bits: 0 or 1.
    • Uses conventional electronic circuits.
    • Excellent for everyday tasks, such as browsing, gaming, and programming.

    Quantum computer

    • Uses qubits.
    • Uses quantum-mechanical properties.
    • May outperform classical computers on certain specialized problems.

    3. Three important principles of quantum computing

    A. Superposition

    A classical bit is either 0 or 1. A qubit can exist in a quantum superposition of the states 0 and 1 until it is measured.

    Mathematically, a qubit can be represented as

    Ψ= α|0| +β|1|

    Here, α and β are probability amplitudes, and

    |α|2 +|β2 = 1

    When measured, the qubit gives either 0 or 1, with probabilities determined by these amplitudes.

    B. Entanglement

    Entanglement is a quantum phenomenon in which two or more qubits share a joint quantum state that cannot be described as independent states of the individual qubits.

    This allows quantum computers to use correlations that have no direct equivalent in ordinary classical bits.

    C. Quantum interference

    Quantum states have probability amplitudes that can interfere with one another.

    • Constructive interference: amplitudes reinforce one another.
    • Destructive interference: amplitudes cancel one another.

    Quantum algorithms use interference to increase the probability of useful outcomes and reduce the probability of unwanted outcomes.

    4. How does a quantum computer work?

    A quantum computer operates through a carefully controlled sequence of quantum operations.

    Step 1: Initialization

    The qubits are prepared in known initial states.

    Step 2: Application of quantum gates

    Quantum gates manipulate the states of qubits. These operations are the quantum equivalents of certain operations used in classical circuits, although their mathematical properties are different.

    Step 3: Quantum computation

    A sequence of quantum gates creates superpositions, entanglement, and interference as required by the algorithm.

    Step 4: Measurement

    At the end of the computation, the qubits are measured to obtain classical results, usually represented by 0s and 1s.

    Step 5: Interpretation of results

    The measurement results are analyzed to obtain the answer to the problem. Some quantum algorithms require repeated runs to estimate the desired probabilities accurately.

    Unlike a classical computer, which can store and process classical bits relatively robustly, quantum computers must carefully protect their qubits from environmental disturbances. These disturbances can cause decoherence and computational errors.

    5. Applications of quantum computing

    Drug discovery and chemistry

    Simulating molecules and quantum interactions to help researchers understand chemical processes.

    Cryptography

    Certain quantum algorithms could break widely used public-key cryptographic systems, while quantum-resistant cryptography aims to protect against these threats.

    Optimization

    Researchers are exploring whether quantum methods can improve certain scheduling, routing, and resource-allocation problems.

    Materials science

    Studying materials that could lead to better batteries, catalysts, and other technologies.

    Most of these applications are still being researched. Today’s quantum computers are not universally faster than classical computers.

    This is a theoretical comparison under specific assumptions, not a guarantee of real-world speed. Quantum operations also have costs and are sensitive to errors.

    Challenges in Quantum Computing

    Despite its enormous potential, quantum computing faces significant scientific and engineering challenges.

    Qubits are highly sensitive to environmental disturbances. Noise and decoherence can destroy quantum information before a calculation is completed.

    Quantum error correction can protect information by encoding logical qubits across multiple physical qubits, but it requires substantial additional resources.

    Building large-scale, reliable quantum computers therefore requires improvements in hardware, error correction, control systems, and algorithms.

    Furthermore, quantum computers are not expected to outperform classical computers on every task. For ordinary activities such as word processing, browsing the internet, and many routine calculations, classical computers remain highly effective.

    Conclusion

    Quantum computing represents one of the most exciting applications of modern physics. By exploiting superposition, entanglement, and quantum interference, it offers new approaches to solving selected computational problems.

    For physics students, quantum computing provides a practical connection between abstract quantum-mechanical principles and emerging technology. It demonstrates how fundamental discoveries about the microscopic world can lead to entirely new ways of processing information.

    Although large-scale practical quantum computing remains a major engineering challenge, continued research may transform fields such as molecular simulation, materials science, and cryptography.

    The central message is simple: quantum computing does not replace the laws of classical computation in every situation; rather, it expands the possibilities of computation by using the laws of quantum mechanics.
  • What are the coherent sources of light?

    What are the coherent sources of light?

    In this topic we will discuss about ,what are the coherent sources of light? What are the necessary conditions to obtain coherent sources of light?why to independent sources of light can’t be coherent?

    1. What are coherent sources of light?

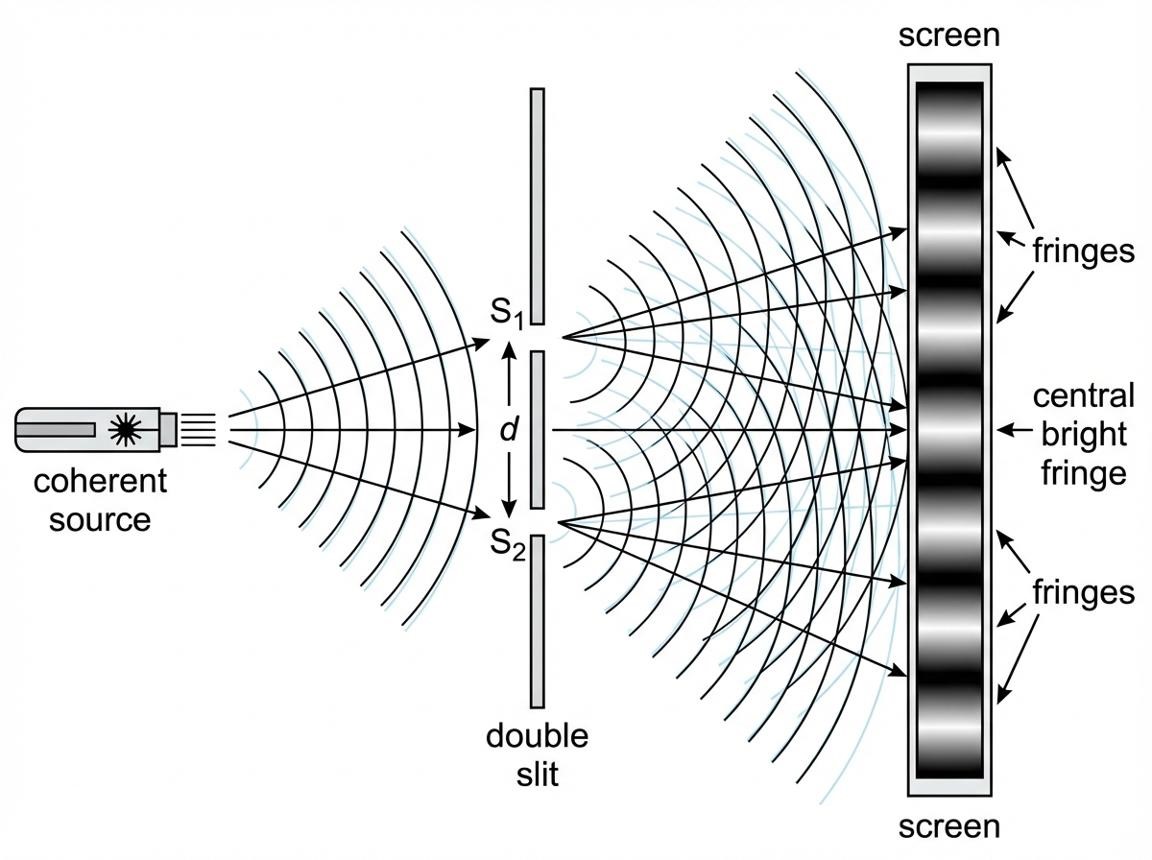
    Definition: Two sources of light are said to be coherent if they emit light waves of the same frequency (or wavelength) and maintain a constant phase difference with time.

    Examples:

    • Two slits illuminated by the same monochromatic light source in Young’s double-slit experiment.
    • Two secondary sources derived from a single source of light.

    2. Conditions to obtain coherent sources of light

    The following conditions are necessary to obtain coherent sources:

    1. Same frequency: Both sources must emit light waves of the same frequency or wavelength.

    2. Constant phase difference: The phase difference between the two waves must remain constant with time.

    3. Same state of polarization: For effective interference, the waves should have the same polarization.

    4. Same source of origin: The sources should preferably be derived from a single source of light, because independent sources emit light with randomly changing phase differences.

    5. Comparable amplitudes: For clearly visible interference fringes, the amplitudes of the two waves should be equal or nearly equal.

    3. How are coherent sources produced?

    In Young’s double-slit experiment, monochromatic light from a single source first illuminates two narrow slits, \(S_1\) and \(S_2\). Since both slits receive light from the same source, they act as coherent sources and produce a stable interference pattern on the screen.

    Important exam point: Two independent light sources cannot generally be coherent because their phase difference changes randomly with time.

    4. Why can’t two independent light sources be coherent?

    Two independent light sources cannot generally produce sustained, stable interference because: 

    • They emit light independently.
    • The phase difference between their waves changes randomly with time.
    • Their emissions arise from independent atomic processes.
    • As a result, the interference pattern averages out over time.

    Conclusion: To obtain a stable interference pattern, coherent sources are required. In Young’s double-slit experiment, both slits are illuminated by the same source, making them coherent.

    Remember for exams: Coherent sources have the same frequency and a constant phase difference.

  • Diffraction of light

    Diffraction of light

    What is diffraction of light?

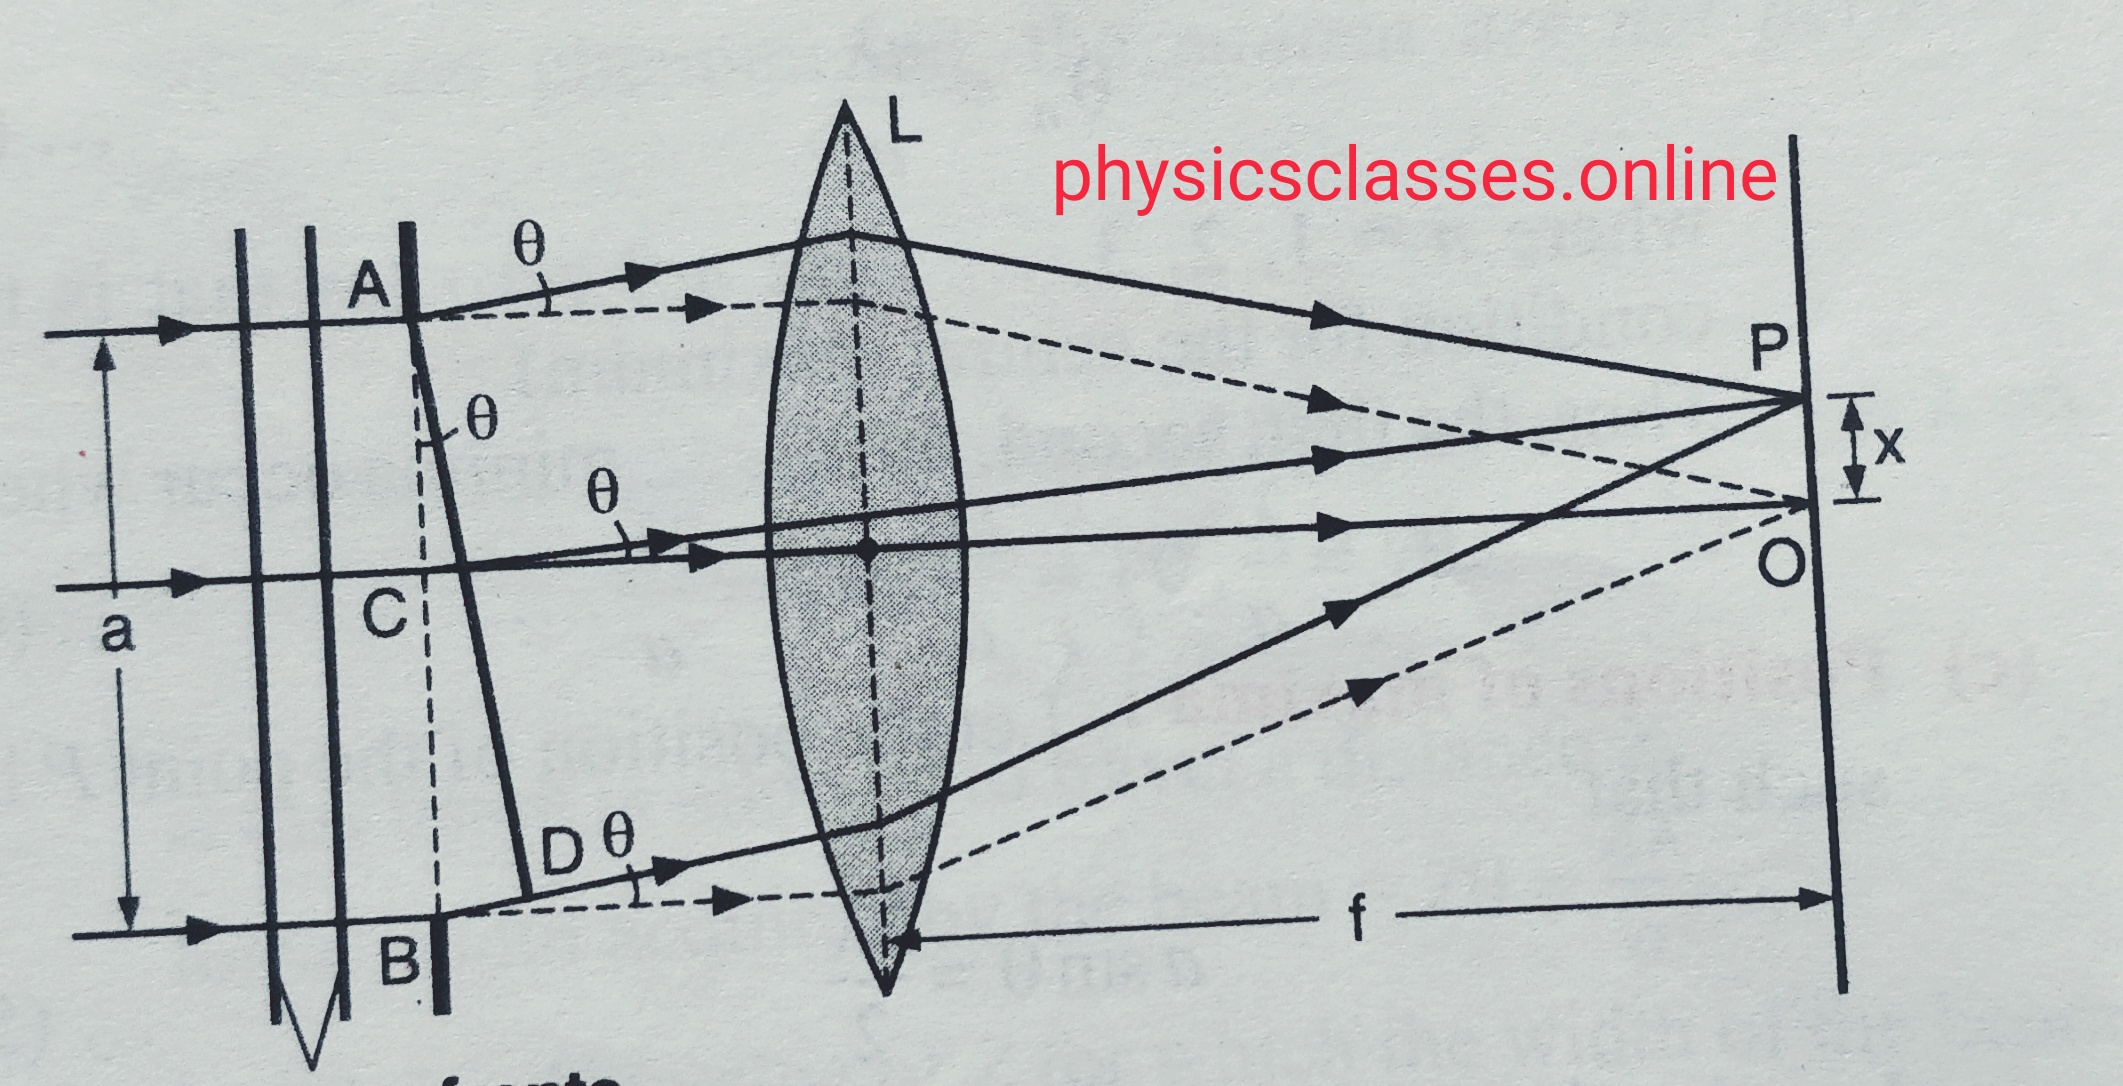
    In this topic we will discuss what is diffraction of light , using single slit experiment formation of central max , position of secondary maxima and minima.

    Diffraction of Light – Single Slit Experiment

    diffraction single slit

    1. What is diffraction of light?

    Diffraction of light is the phenomenon of bending and spreading of light waves when they pass through a narrow slit or around the edge of an obstacle.

    Diffraction is clearly observed when the size of the slit or obstacle is comparable to the wavelength of light.

    To read the complete topic click here-

  • What is photo electric effect?

    What is photo electric effect?

    In this topic we will explain the photoelectric effect and also will explain hertz’s observation and Hallwach’s and Lenard’s observation.

    Photoelectric Effect: Hertz, Hallwachs and Lenard’s Observations

    1. What is the Photoelectric Effect?

    The photoelectric effect is the phenomenon in which electrons are emitted from the surface of a metal when electromagnetic radiation of a suitable frequency falls on it.

    The emitted electrons are called photoelectrons, and the current produced by their motion is called photoelectric current.

    Turning Points in Physics Notes — AQA A-Level

    Example: When ultraviolet light falls on a clean zinc plate, electrons may be emitted from its surface.

    Important terms

    • Photoelectrons: Electrons emitted from a metal surface due to incident light.
    • Work function (ϕ): The minimum energy required to remove an electron from a metal surface.
    • Threshold frequency (ν0): The minimum frequency of light required to produce photoelectric emission.
    • Stopping potential (Vs): The minimum reverse potential required to stop even the fastest photoelectrons.

    Einstein’s photoelectric equation is

    hν=ϕ+Kmax⁡

    where:

    • h= Planck’s constant
    • ν = frequency of incident light
    • ϕ = work function of the metal
    • Kmax⁡ = maximum kinetic energy of emitted electrons

    Since ϕ=hν0

    Kmax⁡=h(ν−ν0)

    This equation explains the main features of the photoelectric effect.

    2. Hertz’s Observation (1887)

    Radio — Whiting-Robertsdale Historical Society

    Heinrich Hertz

    Heinrich Hertz was conducting experiments to demonstrate electromagnetic waves. During his experiments, he observed that ultraviolet radiation helped an electric spark pass between two metal electrodes.

    Experimental observation

    1. Hertz produced an electric spark between two metal electrodes.
    2. He observed that ultraviolet light falling on the electrodes made the spark easier to produce.
    3. When the ultraviolet radiation was blocked, the spark became more difficult to produce.

    Conclusion

    Hertz’s observation indicated that ultraviolet radiation could help release electrons from a metal surface, facilitating the discharge.

    Importance: His observation was an early discovery of the photoelectric effect.

    3. Hallwachs’s Observation (1888)

    Wilhelm Hallwachs

    Wilhelm Hallwachs studied the effect of ultraviolet light on electrically charged metal plates, especially a clean zinc plate.

    Experiment

    Photoelectric Effect
    1. A clean zinc plate was connected to a negatively charged gold-leaf electroscope.
    2. The electroscope’s gold leaf diverged because the plate and electroscope carried negative charge.
    3. Ultraviolet light was allowed to fall on the zinc plate.
    4. The gold leaf gradually collapsed, indicating that the electroscope was losing its negative charge.

    Observation and conclusion

    • Negatively charged zinc plate: It loses negative charge when exposed to suitable ultraviolet light.
    • Positively charged zinc plate: It does not readily discharge through photoelectric emission because the emitted electrons are attracted back to the positively charged plate.
    • Uncharged zinc plate: It can become positively charged after photoelectrons escape.

    Conclusion: Ultraviolet light causes electrons to leave the zinc surface.

    This provided clear evidence that light can cause the emission of electrons from a metal.

    4. Lenard’s Observation (1902)

    Nobel Fisica 1905 > Philipp Eduard Anton von Lenard | Russian history, Historical illustration, Giclee print

    Philipp Lenard

    Philipp Lenard investigated photoelectric emission using a metal surface and an apparatus in which emitted electrons could be collected and measured.

    Experimental setup

    Doodlingo - Learn AI, Computer Science, Physics & Startups Through Doodles

    In a typical arrangement:

    • Light falls on a metal cathode.
    • Photoelectrons are emitted from the cathode.
    • A collector electrode (anode) collects the electrons.
    • The resulting photoelectric current is measured using an external circuit.

    Main observations of Lenard

    1. Photoelectric current depends on light intensity.

    For light of frequency above the threshold frequency, increasing the intensity generally increases the number of emitted electrons per second. Therefore, the photoelectric current increases.

    2. Maximum kinetic energy depends on frequency.

    Increasing the frequency of incident light increases the maximum kinetic energy of photoelectrons, provided the frequency is above the threshold.

    3. Existence of stopping potential.

    A reverse potential can be applied to oppose the motion of photoelectrons. At a particular reverse potential, even the fastest electrons cannot reach the collector, and the current becomes zero.

    Kmax⁡=eVsKmax​=eVs​​

    Here, ee is the magnitude of the electron’s charge and VsVs​ is the stopping potential.

    4. Threshold frequency exists.

    Below a certain minimum frequency, no photoelectrons are emitted, even if the intensity of light is increased.

    Conclusion: Lenard’s experiments established important properties of photoelectric emission and showed that the energy of photoelectrons is related to the frequency of incident light.

    5. Comparison of Hertz, Hallwachs and Lenard

    ScientistMain observationSignificance
    Hertz (1887)UV light made an electric spark easier to produce.Early discovery of photoelectric emission.
    Hallwachs (1888)UV light discharged a negatively charged zinc plate.Demonstrated that electrons leave the metal surface.
    Lenard (1902)Studied emitted electrons, their current, kinetic energy and stopping potential.Established important experimental laws of the photoelectric effect.

    6. Key results to remember for exams

    Intensity of light

    Increasing intensity increases photoelectric current, provided the frequency is above the threshold.

    Frequency of light

    Increasing frequency increases the maximum kinetic energy of photoelectrons.

    Threshold frequency

    Below the threshold frequency, photoelectric emission does not occur, regardless of intensity in the ordinary one-photon photoelectric effect.

    Stopping potential

    The stopping potential depends on the maximum kinetic energy, and therefore on the frequency of light for a given metal.

  • Huygen’s principle

    Huygen’s principle

    Explain Huygen’s principle. In this topic we will discuss what is Huygen’s principle and its applications.

    Huygens’ Principle

    Huygens’ principle states that every point on a wavefront acts as a source of secondary wavelets that spread out in all directions at the speed of the wave. The new wavefront is the forward envelope of these secondary wavelets.

    Explanation of Huygens’ Principle

    According to Huygens’ principle:

    1. Every point on an existing wavefront acts as a source of secondary wavelets.
    2. These secondary wavelets spread in all directions through the medium at the speed of the wave.
    3. After a certain time, a common tangent surface touching the forward edges of all these wavelets forms the new wavefront.

    To know about the wavefront click here-

    https://youtu.be/2Fhm5mJMKNY

    Applications of Huygens’ Principle

    Huygens’ principle helps explain:

    • Reflection of light: Why light changes direction when it reflects from a surface.
      • Refraction of light: Why light bends when it passes from one medium into another.
      • Diffraction of light: How waves spread around obstacles and through narrow openings.

    Mathematical Relation

    If a secondary wavelet travels with speed v for time t, its radius is

    r=vt

    where: v is the velocity of wave ant t is the time taken.

  • What is wavefront ?

    What is wavefront ?

    In this blog we will discuss what is the wavefront and what are its types?

    What is wavefront?

    It is the continuous  locus of all such particles of the medium which are vibrating in the same phase at any instant . So we can say wavefront is the surface of constant phase.( An arrow drown perpendicular to the wavefront in the direction of propagation of wave is called ray.)

    We can also states

    A wavefront is a surface joining all the points of a wave that are vibrating in the same phase.

    For example, the circular ripples produced when you drop a stone into water form circular wavefronts.

    There are three types of wavefront-

     (i) spherical wavefront- When light rays coming out from a point source then the wavefront drawn is spherical wavefront.

    (ii) Cylindrical wavefront- When light rays coming out from a linear source then the wavefront drawn is cylendrical wavefront.

    (iii)Plane wavefront – A small portion of the wavefront acoming from the large distat source gives plane wavefront.

    Next topic –Huygen’s principle click here-.

  • 2D metals sheet

    2D metals sheet

    2D Metals: The New Frontier of Atomically Thin Materials

    By Nayan Jha, Physics Teacher

    Introduction

    Imagine taking an ordinary piece of metal and reducing its thickness until it is only a few atoms thick. Sounds impossible, right?

    For a long time, scientists thought that producing a truly two-dimensional (2D) sheet of metal would be extremely difficult. Unlike materials such as graphene, metal atoms are strongly bonded to their neighbouring atoms in all directions.

    However, researchers Guangyu Zhang, Luojun Du and colleagues at the Institute of Physics of the Chinese Academy of Sciences have demonstrated a method for producing atomically thin sheets of several metals.

    This development could open a new area of research in condensed-matter physics and materials science.

    Step 1: What is a 2D material?

    A 2D material is a material whose thickness is extremely small—often just one or a few atomic layers.

    A famous example is graphene, which consists of a single layer of carbon atoms arranged in a honeycomb structure.

    Since graphene was discovered in 2004, scientists have produced and studied hundreds of other two-dimensional materials.

    Many of these materials naturally consist of layers. The atoms within each layer are strongly connected by chemical bonds, while neighbouring layers are held together by relatively weak van der Waals (vdW) interactions.

    Because these interactions are weak, scientists can sometimes separate—or “shave off”—individual layers.

    To download the objective book for class 12th click here

    Step 2: Why are 2D metals so difficult to make?

    Metals are different.

    In a conventional metal, each atom interacts strongly with many surrounding atoms. These bonds are not restricted to a simple stack of weakly connected layers.

    Therefore, scientists could not simply peel a metal apart in the same way that graphene or some other layered materials can be exfoliated.

    This raised an important question:

    Can a metal actually exist as an atomically thin, two-dimensional sheet?

    The work of Zhang, Du and their colleagues provides an important answer: yes, under suitable conditions.

    Step 3: The researchers’ new technique

    The researchers developed a technique involving what can be described as “van der Waals squeezing.”

    The basic setup used:

    • Pure metal powder
    • Two monolayers of MoS₂ (molybdenum disulfide)
    • Sapphire substrates
    • High temperature
    • High pressure

    The MoS₂/sapphire structures acted as extremely thin van der Waals anvils around the metal.

    Step 4: Melting the metal

    First, the researchers placed the metal powder between the two MoS₂/sapphire structures.

    The system was then heated.

    As the temperature increased sufficiently, the metal powder melted and formed a tiny liquid metal droplet.

    At this stage, the material was no longer a collection of individual powder particles but a molten metal region.

    Step 5: Applying pressure

    The researchers then applied a pressure of approximately 200 MPa.

    For comparison, atmospheric pressure at Earth’s surface is about 0.1 MPa, so 200 MPa represents a very large pressure.

    The MoS₂ layers helped confine and squeeze the molten metal.

    This process is referred to as van der Waals squeezing.

    Step 6: Cooling the material

    The pressure was maintained while the opposite sides of the anvils cooled toward room temperature.

    During this process, the molten metal was confined into an extremely thin region.

    Eventually, the material solidified into an atomically thin metal sheet.

    This is remarkable because the researchers were able to create metal layers only a few angstroms thick.

    Step 7: Which metals were produced?

    The research team successfully produced five atomically thin metals:

    1. Bismuth (Bi)
    2. Tin (Sn)
    3. Lead (Pb)
    4. Indium (In)
    5. Gallium (Ga)

    The thinnest sheets were approximately 6.3 Å (angstroms) thick.

    Since

    1 Å = 10⁻¹⁰ metre,

    6.3 Å is only:

    6.3 × 10⁻¹⁰ metre

    That gives us an idea of just how extraordinarily thin these materials are.

    Step 8: Why is this discovery important?

    Creating a metal in two dimensions gives physicists a new system in which to investigate the behaviour of electrons and atoms.

    When a material becomes extremely thin, its physical properties can change significantly.

    Scientists can investigate questions such as:

    • How do electrons behave when confined to nearly two dimensions?
    • Do metals exhibit unusual electrical properties at atomic thickness?
    • How do their optical and magnetic properties change?
    • Can quantum effects become particularly important?
    • Could these materials be useful in future electronic or nanoscale devices?

    These questions make 2D metals an exciting area of fundamental physics research.

    Step 9: From graphene to 2D metals

    The discovery of graphene demonstrated that materials could behave very differently when reduced to a single atomic layer.

    The development of atomically thin metals expands this concept further.

    Instead of studying only semiconducting or insulating 2D materials, researchers can now investigate metallic systems at extreme thickness scales.

    This could help scientists understand how the properties of matter change as we move from the three-dimensional world toward the two-dimensional limit.

    A simple analogy

    Think of a thick metal sheet like a large block of clay.

    Trying to peel a metal into a single atomic layer is not like peeling the pages of a book, because the atoms inside the metal are strongly connected in many directions.

    The researchers instead used another strategy:

    Melt → Confine → Squeeze → Cool → Form an ultrathin metal sheet

    This simple sequence captures the basic idea behind the technique.

    The bigger picture

    The researchers describe their work as just the “tip of the iceberg.”

    The five metals produced in this study may be only the beginning. The technique could potentially provide scientists with opportunities to investigate other metals and unusual low-dimensional structures.

    For physics, this is particularly interesting because reducing dimensionality can reveal phenomena that are difficult to observe in bulk materials.

    Conclusion

    The production of atomically thin sheets of bismuth, tin, lead, indium and gallium represents an important development in the study of two-dimensional materials.

    The key idea is not simply making a metal thinner. It is about exploring how the fundamental properties of matter change when a material is confined to an almost two-dimensional form.

    From graphene to 2D metals, scientists are continuing to discover that when matter is reduced to the nanoscale, familiar materials can display entirely new possibilities.

    Physics teaches us that changing the dimensions of matter can change the physics itself.

    — Nayan Jha
    Physics Teacher

    What is 4D metal sheet ? To get the answer click here

  • What is 4DX and How Does It Work?

    What is 4DX and How Does It Work?

    What is 4DX and How Does It Work?

    Written by: Nayan Kumar Jha (Director Of Physics Classes)

    When a Movie Is Not Just Watched, But Felt.

    In this block we will learn what is 4DX and how it works in different different mode, how it is created? How it is invented ? And working functions of all the modes. Where we can feel this experience in India? And one of the most important question , What is the role of chair in 4DX MOVIE?

    4DX  stands for 4D film presentation system that adds multi-sensory physical effects to a standard 2D or 3D movie.

    4DX (Four-Dimensional eXperience) is a 4D film presentation system developed by CJ 4DPlex, a subsidiary of South Korean theater chain .

    It allows films to go with various practical effects,

    In a conventional cinema, we mainly experience a movie through our eyes and ears. We see the images on the screen and hear the sound through the speakers.

    But imagine watching a car chase where your seat moves with the car, feeling wind during a storm scene, experiencing a gentle water effect during rain, or feeling vibrations during an action sequence.

    This is the idea behind 4DX.

    What is 4DX?

    4DX is an advanced cinematic technology developed by CJ 4DPLEX.

    It combines the movie’s visuals and audio with synchronized motion and environmental effects. In simple words, 4DX allows audiences not only to watch and hear certain scenes, but also to physically experience selected effects from those scenes.

    What Effects Are Used in 4DX?

    Depending on the movie and scene, a 4DX auditorium can provide effects such as:

    * Motion: Seats can move in different directions.

    * Vibration: Vibrations can accompany explosions, vehicles and action sequences.

    * Wind: Air effects can simulate wind or storms.

    * Water/Rain: Water or mist effects can accompany rain and water scenes.

    * Fog: Fog effects can create atmospheric environments.

    * Lightning/Light effects: Synchronized flashes can simulate lightning.

    * Scent: Some presentations use fragrances as part of the experience.

    * Snow and bubbles: Certain productions may also use these effects.

    CJ 4DPLEX says its 4DX format can incorporate more than 21 motion and environmental effects.

    How Does 4DX Work?

    This is where the science becomes particularly interesting.

    Suppose a movie shows a car moving rapidly along a road.

    In a normal cinema, you see the car and hear its engine and surrounding sounds.

    In a 4DX presentation, the movie is specially programmed so that physical effects can be synchronized with particular moments in the scene.

    When the car turns, the seat may move. When the vehicle travels over rough terrain, vibrations may be introduced. During a windy scene, air effects can be activated.

    The basic process can be represented as:

    Movie Scene → Timing/Control Data → Theatre Control System → Motion & Environmental Effects

    The synchronization between these systems creates the feeling of being physically closer to the action.

    CJ 4DPLEX explains that immersive formats require scene-by-scene preparation, including timing and continuity adjustments.

    Is 4DX Based on Physics?

    Yes. Several areas of physics and engineering are involved.

    Motion seats use controlled mechanical systems to create movement. Air systems produce wind effects. Water systems create water or mist effects, while lighting systems can produce synchronized flashes.

    In simple terms, 4DX combines:

    Computer-controlled mechanical + pneumatic + electrical + environmental systems

    to create a synchronized cinematic experience.

    The most important element is timing and synchronization.

    If a car crashes on the screen but the seat moves several seconds later, the illusion would be lost. Therefore, the physical effects need to be carefully coordinated with the movie.

    Is 4DX Used Only for Movies?

    4DX was primarily developed for cinematic experiences, but immersive technology can also be applied to other forms of entertainment.

    CJ 4DPLEX has described applications involving live and pre-recorded content, gaming events and concerts in addition to films.

    This suggests that multisensory entertainment can have applications beyond conventional movie screenings.

    Is 4DX Available in India?

    Yes. 4DX is available in India.

    4DX auditoriums have been introduced in Indian multiplexes, particularly through PVR INOX.

    For example, PVR Cinemagic at Ambience Mall, Gurugram include

    How 4DX Works

    • Motion Seats: Chairs move, vibrate, pitch, roll, and twist in sync with the action on the screen.
    • Environmental Effects: The theater uses built-in equipment to simulate real-world elements like wind, rain, fog, snow, bubbles, lightning, and various scents.
    • Control: Most armrests feature a button to toggle water effects on or off, though other environmental features cannot be adjusted manually.

    Key Features

    • Immersion: It turns passive movie-watching into an interactive ride similar to a theme park attraction.
    • Format: Movies shown in 4DX can be in either 2D or 3D; if the film is in 3D, specialized glasses are still required for the visual depth.
    • Suitability: It is popular for action, horror, and adventure films, but it is generally not recommended for individuals with severe back problems, heart conditions, or sensitivity to sudden movements and strobe lights.
    •  https://www.youtube.com/watch?v=O6HzEOnJ_zw&t=131s
    • The scientific and engineering process behind 4DX relies on precise synchronization, mechanical physics, and automated fluid dynamics. The entire experience is driven by an underlying data track that coordinates three core pillars of technology

    Role of chairs in the 4dx theater

    The 4DX motion chair is not just a seat; it is a complex piece of robotic and mechanical engineering. Its primary function is to transform visual kinetic energy from the screen into physical kinetic energy that you can feel.

    The properties and internal technologies loaded into a 4DX chair can be broken down into two main categories: Kinematic Motion (How it moves) and Tactile/Atmospheric Effects (What it simulates).


    1. Kinematic Motion Properties (The 3 DoF System)

    The base of every 4DX chair block (usually configured in connected rows of 4 seats) is loaded with heavy-duty servomotors or hydraulic actuators. These allow the chair to move across Three Degrees of Freedom (3DoF) to match camera angles and vehicle movements:

    • Pitch (Tilt Forward/Backward): The chair pitches forward during braking, diving, or leaning over a ledge, and pitches backward during rapid acceleration or rocket liftoffs.
    • Roll (Tilt Left/Right): The chair leans sideways to replicate sharp turns, drifting cars, or a fighter jet banking through the air.
    • Heave (Move Up/Down): The entire unit lifts up or drops down vertically to simulate falling, jumping, driving over bumps, or the weightlessness of a roller coaster drop.

    2. Tactile and Sensory Properties Built Into the Chair

    Aside from moving through space, the chassis of the chair itself is densely loaded with localized sensory hardware:

    • Shakers / Transducers (Vibration): Built into the backrest and the bottom cushion. Unlike standard gaming controllers, these use sub-sonic audio frequencies to create subtle textures—like the purr of a sports car engine, a low rumble of thunder, or the heavy thud of an explosion.
    • Back Ticklers & Back Heavers: Mechanical pins or plates hidden inside the back cushion. They suddenly poke or thump your back to simulate a punch, a bullet impact, or something sneaking up behind you.
    • Leg Ticklers: Flexible rubber or plastic cords located underneath the seat. A mechanical motor whips them against your calves to simulate insects crawling, rats running, or water splashing past your legs.
    • Face Air Jets & Water Nozzles: Mounted on the rear of the headrest directly in front of you. They shoot targeted bursts of compressed air or a fine mist of water straight at your face to mimic wind, gunshots, or splashing waves. (The water can be turned off via a physical button on your armrest).
    • Neck Air Jets: Built into the sides of your own headrest. They shoot a sudden, chilly blast of air right past your neck and ears to create jump scares or the feeling of a ghost passing by.
    • Scent Dispensers: Small chemical diffusion cartridges inside the front-facing seatback that vaporize specific scent oils (e.g., burning rubber, gunpowder, coffee, or fresh grass) directly into your breathing zone when triggered by the movie’s timeline.

    Click here to know how students should use AI?-

  • Why online study is dangerous for students?

    Why online study is dangerous for students?

    Why Online Study Can Be Dangerous for Students? Risks, Distractions and the Right Way to Learn.

    Online education has made learning easier than ever before. But is studying online always beneficial for students?

    Today, students can attend online classes, watch educational videos, use AI tools, download notes, solve questions, and access thousands of educational resources from a single smartphone.

    However, excessive and unplanned online study can create serious challenges for students. The problem is not online education itself; the real problem is excessive screen time, distraction, passive learning, unreliable information, and dependence on technology.

    How to use artificial intelligence click here to know

    What Makes Online Study Dangerous for Students?

    1. Excessive Screen Time

    Students can spend several hours every day looking at mobile phones, tablets, or computers.

    Although some of this time may be educational, excessive screen exposure can reduce physical activity and may contribute to eye strain, headaches, poor posture, and difficulty maintaining a healthy routine.

    Students should take regular breaks and balance online learning with offline study.

    1. Online Distractions

    A smartphone is both a learning device and an entertainment device.

    A student may open YouTube to watch a physics lecture and soon become distracted by unrelated videos, games, social media, or notifications.

    This creates a major challenge:

    The device that helps students study can also become the biggest distraction.

    1. Too Many Educational Resources

    The internet provides an enormous amount of study material.

    Students may watch lectures from several teachers, download multiple PDFs, use different websites, and follow numerous study plans.

    Instead of improving preparation, this can create confusion.

    A student does not need ten explanations of every chapter. They need one clear explanation followed by consistent practice.

    1. Passive Learning

    Watching an educational video is not the same as understanding a subject.

    For example, a student may watch an entire physics lecture on electromagnetic induction and feel that the chapter is easy. But when they attempt numerical problems without the video, they may struggle.

    This happens because watching is passive, while problem-solving is active learning.

    A better approach is:

    Watch → Understand → Write → Solve → Test → Revise

    1. Dependence on AI

    AI tools are becoming increasingly popular among students.

    They can explain difficult concepts, generate examples, provide practice questions, and help students understand mistakes.

    But students should not use AI simply to obtain answers.

    If a student asks AI to solve every problem without attempting it independently, their problem-solving ability may not develop properly.

    The best use of AI is to support thinking rather than replace thinking.

    1. Unreliable Information

    Not everything available online is accurate.

    Students may encounter incorrect explanations, outdated information, misleading shortcuts, or content created without proper academic knowledge.

    Therefore, students should verify important information using reliable textbooks, qualified teachers, official educational resources, and trusted sources.

    1. Reduced Physical Activity

    Online classes can make studying more convenient, but students may spend long periods sitting in front of a screen.

    Education should not mean sitting continuously for many hours.

    Students should include physical activity, outdoor time, adequate breaks, and other offline activities in their daily routine.

    1. Sleep and Study Routine

    Many students use mobile phones late at night for online classes, videos, social media, or revision.

    A disturbed sleep routine can make it harder to concentrate and remember information effectively.

    A good study plan should therefore include adequate sleep and regular breaks, rather than simply increasing screen time.

    Online Study vs Offline Study

    Neither online nor offline education needs to completely replace the other.

    Online learning is useful for:

    • Understanding difficult concepts
    • Revising chapters
    • Watching demonstrations
    • Accessing additional resources
    • Practising questions
    • Learning at one’s own pace

    Offline learning is particularly valuable for:

    • Writing practice
    • Solving numerical problems
    • Reading textbooks
    • Classroom interaction
    • Discussion with teachers
    • Developing concentration without digital distractions

    The most effective approach for many students can be a balanced combination of online and offline learning.

    How Should Students Use Online Education?

    Students can follow some simple rules:

    1. Have a fixed study schedule.
      Do not study randomly whenever you pick up your phone.
    2. Turn off unnecessary notifications.
      This reduces interruptions.
    3. Take regular breaks.
      Do not continuously stare at a screen for hours.
    4. Make handwritten or offline notes.
      Writing helps students actively process what they learn.
    5. Solve questions without looking at the solution.
      This is particularly important for subjects such as Physics and Mathematics.
    6. Use fewer but better resources.
      Choose reliable teachers and study material instead of continuously switching between sources.
    7. Use AI intelligently.
      Ask AI to explain a concept or identify your mistake rather than simply copying an answer.

    The Most Important Question

    Students should not measure their preparation by the number of hours they spend online.

    Instead of asking:

    “How many hours did I study today?”

    ask:

    “What did I learn today, and can I solve questions without help?”

    This simple change in thinking can make online education much more effective.

    Final Thoughts

    Online education is a powerful tool. It can make quality educational content accessible to millions of students.

    But technology should remain a tool for education, not become a substitute for thinking, teachers, textbooks, practice, sleep, physical activity, and real-world experiences.

    For students, the goal should not be to spend more time online.

    The goal should be to learn better, think independently, practise regularly, and use technology wisely.

    A Message for Students

    Use YouTube for learning, not endless scrolling.
    Use AI for understanding, not copying.
    Use online classes for guidance, not as a replacement for practice.
    And remember: watching a lecture is only the beginning of learning.

    — Physics by Nayan Jha

  • Uses of artificial intelligence for students

    Uses of artificial intelligence for students

    When students should use AI and when shouldn’t

    What is artificial intelligence? to know the answer click here-

    Using AI in your studies is a double-edged sword. Recent research—including findings from the global OECD PISA reports—shows that students who rely on AI to generate answers or bypass reading often perform worse on exams, while those who use it strategically to test themselves gain a significant edge.

    To get the most out of AI without dulling your own critical thinking, here is when you should and shouldn’t use it.

    Nayan Jha Sir’s perspective aligns closely with core pedagogical principles, especially for conceptual subjects like Physics. His advice highlights the essential distinction between verification/quick utility and deep, foundational learning.

    1. Where AI Works Well (As a Quick Reference & Verification Tool)

    • Checking Correctness & Confirming Answers: Once you have solved a numerical problem on your own, using AI to check whether your final answer or calculation steps match is an efficient use of technology.
    • Quick Definitions & Short Topics: For fast factual queries (e.g., “What is the standard value of Permittivity of Free Space?” or “Define Lenz’s Law in two lines”), AI acts like a smart dictionary saving you time.
    • Saving Time on Minor Clarifications: When you are stuck on a minor unit conversion, a specific formula variable, or a quick definition, AI prevents you from breaking your workflow to search through textbooks.

    2. Why AI Fails as a “Full-Time Teacher” for Deep Physics Concepts

    • Formula Derivations Require Step-by-Step Logic: Physics derivations are not about memorizing lines; they are built on fundamental laws (like Gauss’s Law, Conservation of Energy, or Newton’s Laws). Seeing an AI output a derivation instantly deprives your brain of following the step-by-step physical logic.
    • Lack of Intuition: Physics requires spatial and physical intuition (understanding vectors, field lines, motion under gravity, etc.). An AI can display equations, but a human teacher or active problem-solving builds the mental model of why a force acts in a certain direction.
    • Practice-Based Skills Need Muscle Memory: Mastering Physics—especially for exams like CBSE Boards, JEE, or NEET—comes from struggling through multi-step numericals yourself. AI provides answers instantly, creating a false sense of understanding (“illusion of competence”) that crumbles during an actual exam.

    The Practical Rule

    Treat AI as a sanity check after you have put in the work. Use it for quick fact-checking and answer verification, but rely on teacher-led instruction, textbooks, and personal problem-solving when tackling new concepts, derivations, and practice numericals.

    When to Use AI (As a Tutor or Assistant)

    Use AI when it acts as an active learning accelerator—a tool that pushes you to think harder, test yourself, or organize your workload.

    • Generating Active Recall Quizzes: Paste your own study notes into AI and ask it to write a 10-question multiple-choice practice quiz or flashcards to test your retention.
    • Breaking Down Complex Concepts (Feynman Technique): Ask AI to explain a tough topic using an analogy. For example: “Explain quantum superposition like I’m 12 years old.”
    • Structuring Study Plans & Time Management: Use AI to draft realistic daily revision schedules, break large projects into smaller tasks, or format messy study notes into clean tables.
    • Feedback and Editing Assistant: Draft an essay or response on your own first, then ask AI to critique your argument, check for grammar, or point out logical gaps.
    • Socratic Problem Solving: Tell the AI: “Do not give me the answer. Ask me step-by-step questions to help me solve this math problem myself.”

    When NOT to Use AI (As a Shortcut or Substitute)

    Avoid AI when it replaces the mental effort required to build brain connections. If the tool does the thinking, you won’t retain the knowledge when exam day arrives.

    • First-Pass Reading & Summarization: Don’t rely on AI to summarize a textbook chapter or research paper before you’ve read it. The act of reading and picking out core ideas yourself is where retention happens.
    • Drafting Assignments or Homework Responses: Writing is how you structure your thoughts. Having AI generate full paragraphs or complete assignments bypasses the primary goal of learning.
    • Fact-Checking Without Verification: AI chatbots can hallucinate incorrect facts, citations, or formulas. Never use AI as a primary source for historical data, citations, or precise calculations without double-checking against trusted textbooks.
    • Solving Math/Physics Problems directly: Copy-pasting a problem to instantly get the final step-by-step solution creates a false sense of mastery. You need to struggle through the steps yourself to build problem-solving stamina.

    The Golden Rule: Use AI to test your understanding, clarify sticking points, and organize your time—never to replace the physical act of reading, writing, and problem-solving.